Instructions for setting up SOGo
Instructions for setting up SoGo
Contacts and calendar entries can be synchronized with SOGo under Android using the "Open Sync" app. This automatically integrates (synchronizes) contact data and the calendar, including their appointment data, which have been entered on the SOGo interface, into the calendar or contacts app of your mobile device. The steps required for this are described below:
1. search for the "Open Sync" app from the provider "Deepen Dhulla" in the Google Play Store and install it on your device
2. check permission settings (depending on the cell phone, e.g. hold down the icon in the app list and go to app details)


14. select "Log in with URL and user name" and make the following entries:
- Base URL: "https://sogo.uni-osnabrueck.de/SOGo/dav/"
- Username: RZ ID (without @uni-osnabrueck.de)
- Password: The password of your RZ ID
Then click on "Login"


20. set the frequency of synchronization and limit the connection type for synchronization if desired (frequent synchronization probably reduces the battery life)

Contact data and the calendar including their appointment data entered on the SOGo interface can be automatically integrated (synchronized) into the calendar or contacts app of the iPhone (iOS version 14.4.1). The steps required for this are described below:


6. enter data as shown in the picture - the following entries are expected:
Server: "sogo.uni-osnabrueck.de:443/SOGo/dav/Benutzerkennung" (here: "sogo.uni-osnabrueck.de:443/SOGo/dav/xmuster")
User ID: The user ID of the person who provides the calendar for synchronization (here:xmuster)
Password: The password associated with the user ID
Description: freely selectable


6. enter data as shown in the picture - the following entries are expected:
Server: "sogo.uni-osnabrueck.de"
User ID: The user ID of the person who provides the address book for synchronization (here: xmuster)
Password: The password associated with the user ID
Description: freely selectable


10. enter the advanced settings
Use SSL: Activate
Port: 443
Acoount URL: "https://sogo.uni-osnabrueck.de/SOGo/dav/Benutzername"(here: "https://sogo.uni-osnabrueck.de/SOGo/dav/xmuster")
After entering the data, you can switch back. The setup is complete.

Written instructions for integrating SoGo into Thunderbird
Setting up the e-mail
1. the following window is automatically displayed when Thunderbird is started for the first time.

2. enter your name, your university e-mail with @uni-osnabrueck.de and your e-mail password. If you then click on continue, Thunderbird will automatically load some settings. These must then be adjusted manually by clicking on the Set up manually button below.

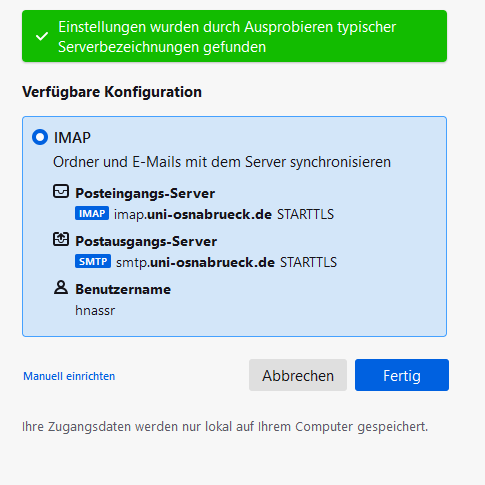
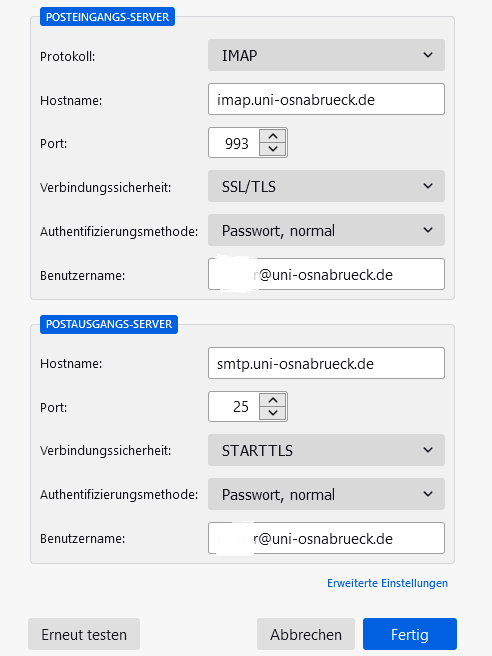
3. the SSL tab on the incoming mail server page must then be changed to SSL/TLS. On the outgoing mail server side, the server link must be changed from smtp.uni-osnabrueck.de to smtp-auth.uni-osnabrueck.de and set as port 25.
Setting up the calendar
1. by pressing the Alt key, a number of additional selection options appear at the top. First click on the button "File" -> "New" -> "Calendar". In the window that now appears, select the "In network" field and click on continue. In the following screen you now need the link to the calendar.

2. to get this, log in to your SoGo account, go to the calendar you want to synchronize and click on the three dots next to this calendar. In the menu that now appears, select the "Link to this calendar" button.


4. now paste this into the "Address" field in the window that is already open in Thunderbird. You must then enter your user name, select CalDAV under Format and click on "Next".

5. now all you have to do is enter your name and click on "Finish". Your calendar should now appear on the right-hand side, where you can enter new appointments and tasks.
Synchronization of contacts
1. to be able to synchronize your own contacts, you need the add-on Cardbook. To add add-ons, press the "Alt" key again and then select the "Extras" -> "Add-ons" button in the top selection bar. Then enter "Cardbook" in the search bar and install the first result.

2. as soon as this has been added by you, a corresponding setup window will open automatically. In the first window, you can simply click on "Next". In the second window, however, the preselected address books must be deselected, as the local address books displayed there are not required.

3. after deselecting, you can simply press "Cancel", as these local address books are not required. The following button should then appear at the top right:

4. select it and then press the three dots on the left-hand side of the screen and select the fields "Address book" -> "New address book" in the menu that appears.

5. in the window that now opens, select the "In the network" tab and click on continue. Then enter the link https://sogo.uni-osnabrueck.de/SOGo/dav as the URL in the new window, as well as your user name and password.

6. then click on the "Check" button and as soon as this has been done successfully, you should be able to click on the "Next" button. Now select vCard version 4.0 from the address books in the new window and uncheck the LDAP Auth Directory box.

Setting up Outlook via the university mail server
1. press "Win+R" and type "control" in the small window that opens to access the old Control Panel.
2. select "small icons" under Display.
3. switch to the settings "Mail" or "Email" or similar (depending on the Outlook version).

4. click on "Show profiles" under "Profiles".
5. create a new profile by clicking on "Add..."
6. the profile should be named "sogo-rz".
7. after confirmation, an "Add account" window should open automatically
8. select "Manual configuration or additional server types" and click on "Next".
9. select "POP or IMAP" in the next window and click "Next".
10. enter the following data in the next window
Under Email address:
Employees: vorname.nachname@uni-osnabrueck.de
Hiwis: rzkennung@uni-osnabrueck.de
11. select "IMAP" under Account type
12. enter "imap.uni-osnabrueck.de" under Incoming mail server.
13. under Outgoing mail server enter "smtp-auth.uni-osnabrueck.de".
14) "User name" and "Password" are the RZ identification of the person.

15. then click on "Further settings".
16. under "Outgoing mail server", check the box "Outgoing mail server requires authentication".
17. under "Advanced"
Select "SSL/TLS" or only "SSL" (depending on the version) as the connection type for the incoming mail server, the port should now automatically change to "993".
Select "STARTTLS" (if available) or only "TLS" (version-dependent) as the connection type for the outgoing mail server, the port should now automatically change to "25".

18. confirm with "OK".
19. click "Next".
20. automatic tests should now be carried out. In the event of errors (if there are no green check marks after the tests), check the details from before again.
21. then click on "Close" and "Finish".
22) The profile window that you previously accessed via "Show profiles" should now be open again.
23. if access to the old profile is still required, select "Confirm profile to be used". This allows you to select one of the profiles when starting Outlook. Alternatively, select "sogo-rz" under "Always use this profile".
24 This concludes the configuration of Outlook.
Activate synchronization with SOGo - Only for calendar, contacts and tasks
Synchronizing the data used in Outlook with the SOGo profile is not only useful for users of both platforms. We would recommend every Outlook user to set this up, as it also represents a backup of the data. In an emergency, if there are problems with Outlook, everything relevant to you can still be accessed via SOGo and used without restrictions. An Outlook add-in called "CalDav Synchronizer" is used to implement this. The PST file, if you are a former Exchange user, is integrated after the synchronization has been set up. The data migrated from Exchange is then automatically synchronized with SOGo.
Installing and setting up the CALDAV Synchronizer
1. download the "CalDav Synchronizer" (https://caldavsynchronizer.org/de/download/) and install it (the link can also be found under Z:\Common\EDV\Exchange-Migration).
2. open Outlook.
3. select the "CalDav Synchronizer" tab in Outlook
4. click on "Synchronization Profiles".
5. click on the "Add multiple Profiles" icon.

6. select "SOGo" (right center) and confirm with "OK".
7. check "Use IMAP/POP3 account password"
8. click on "Get IMAP/POP3 account settings

9. replace imap with sogo for DAV-URL
10. click on "Discover resources and assign to Outlook folders" and perform mapping

11. in SOGo, if you do not yet have any entries, create a test entry in the contacts, in your calendar and in the tasks (which can be found in the calendar). If you want to use different calendars/contact lists in Outlook, create an equivalent list/calendar for each in SOGo.
12. then click "Discover resources and assign to Outlook folders".
Synchronization of the calendar
1. in "Discover resources and assign to Outlook folders", select "Calendars" in the top bar.
2. click on "..." next to the "Personal calendar" and select the corresponding Outlook folder for the SOGo calendar (if only one calendar is used, this should be found under "Calendar (This computer only)"). Unfortunately, this is not possible for tasks because these are linked to the respective calendars in SOGo.
3. if you use several calendars, you must select the appropriate Outlook folder for each SOGo calendar via "..." exactly as described above.
4. the SOGo calendar is now synchronized with the local Outlook calendar.

Synchronization of contacts
1. if you do not yet have an entry in your SOGo contacts, create a test entry. Empty contact lists lead to an error message.
2. in "Discover resources and assign to Outlook folders", select "Address Books" in the top bar.
3. click on "..." next to the "Personal address book" and select the corresponding Outlook folder to the SOGo address book (if only one address book is used, this should be found under "Contacts (This computer only)").
4. ignore the "LDAP Auth. Directory"!
5. if you use several contact lists, you must select the appropriate Outlook folder for each SOGo contact list via "...", exactly as described above.
6. the Outlook contacts are now synchronized with the SOGo contacts.

Synchronizing the tasks
1. if you do not yet have an entry in your SOGo tasks, create a test entry. Empty task lists lead to an error message.
2. in "Discover resources and assign to Outlook folders", select "Tasks" in the top bar.
3. as the tasks can be found within the calendar in SOGo, "Personal calendar" is displayed as the name.
4. click on "..." next to the "Personal calendar" and select the corresponding Outlook folder for the SOGo tasks (if only one task list is used in Outlook, this should be found under "Tasks (This computer only)").
5. if you use several calendars in SOGo, select the calendar to which you want to assign the tasks.
6. the Outlook tasks are now synchronized with the SOGo tasks.

Migration of Exchange contacts, calendars and tasks
Saving the PST file locally
1. run the script under "Z:\Common\EDV\Exchange-Skripte\V1.0.1\Skript zum Kopieren der PST vom Netzlaufwerk starten.bat". This script...
- compares the sizes of the PST file and the free disk space in a summary and asks the user to confirm this.
- Automatically reads the user name and asks if it is correct.
- Copies the PST file from the network drive folder "ExchangePST" to a local folder under "C:\User\<username>\Local\ExchangeFB9
Migration of Exchange contacts, calendars and tasks
Migration of contacts
1. open the Outlook contacts
2. switch to the "File/Open and export" tab and click on "Import/Export"
3. select "Import from other programs or files" and confirm with continue
4. select "Outlook data file (.pst)" and confirm with continue
5. select the path "C:\User\<username>\local\ExchangeFB9\<filename>.pst" (if copied using the script, see "Activating synchronization with SOGo - Only for calendars, contacts and tasks")
6. select "Replace duplicates with imported elements" and confirm with "Next
7. select the "Contacts" folder
8. select "Import items into the current folder" and click "Finish".
Migration of the calendar
1. open the Outlook calendar
2. switch to the "File/Open and export" tab and click on "Import/Export"
3. select "Import from other programs or files" and confirm with continue
4. select "Outlook data file (.pst)" and confirm with continue
5. select the path "C:\User\<username>\local\ExchangeFB9\<filename>.pst" (if copied using the script, see "Activating synchronization with SOGo - Only for calendars, contacts and tasks")
6. select "Replace duplicates with imported items" and confirm with "Next"
7. select the "Calendar" folder
8. select "Import items into the current folder" and click "Finish".
Migration of the tasks
1. open the Outlook tasks
2. switch to the "File/Open and Export" tab and click on "Import/Export"
3. select "Import from other programs or files" and confirm with continue
4. select "Outlook data file (.pst)" and confirm with continue
5. select the path "C:\User\<username>\local\ExchangeFB9\<filename>.pst" (if copied using the script, see "Activating synchronization with SOGo - Only for calendars, contacts and tasks")
6. select "Replace duplicates with imported elements" and confirm with "Next
7. select the "Tasks" folder
8. select "Import items into the current folder" and click "Finish".
Integrating the mails
For the time being, the mails are not synchronized with SOGo due to the amount of data, but only integrated into Outlook!
1. switch to the Outlook mail folder
2. select "Open Outlook file" under "File/Open and export"
3. select the path "C:\User\<username>\local\ExchangeFB9\<filename>.pst" (if copied using the script, see "Activate synchronization with SOGo - Only for calendars, contacts and tasks")
3. the file should now be found as a separate folder in Outlook